Are you looking for a reliable screen recorder for your Microsoft Surface Pro? Look no further!
In this article, we’ll go over the three best ways to screen record on your Surface Pro, and the step-by-step guide on how to get started screen recording.
Whether you’re trying to capture a video tutorial, a gaming session, or general screen activity, there’s a screen recording method for everyone.
- Built-in Microsoft Surface Pro Screen Recorder Game DVR
Game DVR is Microsoft’s built-in recording software that comes preloaded with all versions of Windows 10. It’s an excellent screen recorder that can capture videos of applications, games, and other activities on your system.
Here’s how to start recording with it:
How to Start Recording with Microsoft Game DVR?
Here are the steps on how you can record using Microsoft Game DVR:
- To begin, ensure that you have a keyboard connected to your Surface Pro.
- Press the combination of Win + G keys to open the Game Bar dialog. From there, check the box that says “Yes, this is a game” to load the Game Bar.
- Enable the Game Bar functionality.
- When you are ready to start capturing your Surface screen, you have two options: either click on the Start Recording button or use the keyboard shortcut Win + Alt + R.
- To conclude the recording, simply click on the blue recording bar.
- The recorded video will be automatically saved in a subfolder named “Capture” on your Surface Pro.

Quick Tip:
If your Surface Pro is not running Windows 10, you can still use third-party screen recording software to record your screen. In the third section, we will highlight an exceptional option for screen recording on your Surface Pro.
- Built-in Microsoft Surface Pro Screen Recorder Microsoft Stream
Microsoft Stream is another great option for those who want an easy way to record their screens on their Surface Pro devices without installing any additional software—it’s already built into Windows 10!
Here’s how it works:
How to Use the Built-in Microsoft Stream Screen Recorder?
- Open Microsoft Stream in your Surface Pro browser and sign up/sign in.
- After logging in, locate the “+”” icon in the top right corner of the screen to initiate a new recording.
- Select “Record” from the options that appear, and you will be redirected to the recording settings.
- Within the recording settings, you have the flexibility to customize the resolution, audio input and output, as well as camera settings according to your preferences.
- Once you have configured all the settings, click “Start” to commence the video recording.
- At any point during the recording, you can use the green bar located at the top of the screen to pause or end the recording.
- After completing the recording, click “Save” to finish the process and store the recording in your Microsoft Stream account.
- To share the video with others, you have two options: you can either utilize the “Share” button to copy the link, or you can upload it directly to a website using the “Player” tab.
- Additionally, you have the ability to enhance discoverability and interaction with your video by adding comments, attachments, or tags.
- Congratulations! You have successfully created a new Microsoft Stream recording on your Surface Pro.
- Record On Microsoft Surface Pro Online For Free With RecordJoy
Our favorite free online screen recorder – RecordJoy – makes it easier than ever for anyone looking for an effortless way to quickly capture their screens without installing additional software and compromising their computer disk space.
What Key Features Does RecordJoy Have?
RecordJoy offers video editing features such as free screen recording at 720p, trimming, and cropping. Its features extend to making videos into links, so you don’t have to store your large high quality video files on your computer but instead generate an online link where your video can be viewable by third parties.
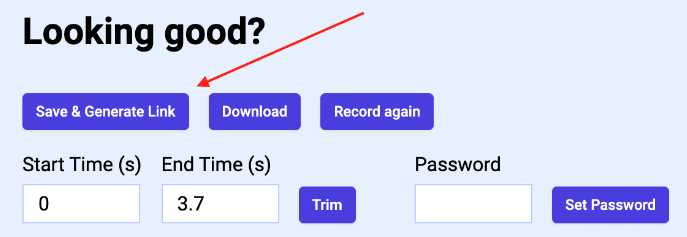
Another great addition to this feature is that you can generate a password for your video so only your target audience that has the password can view it.
How To Use RecordJoy’s Online Screen Recorder?
RecordJoy comes packed with several features that will make a screen recording on your Surface Pro a breeze.
With RecordJoy you can start recording instantly after opening their homepage by clicking “Start screen recording”.
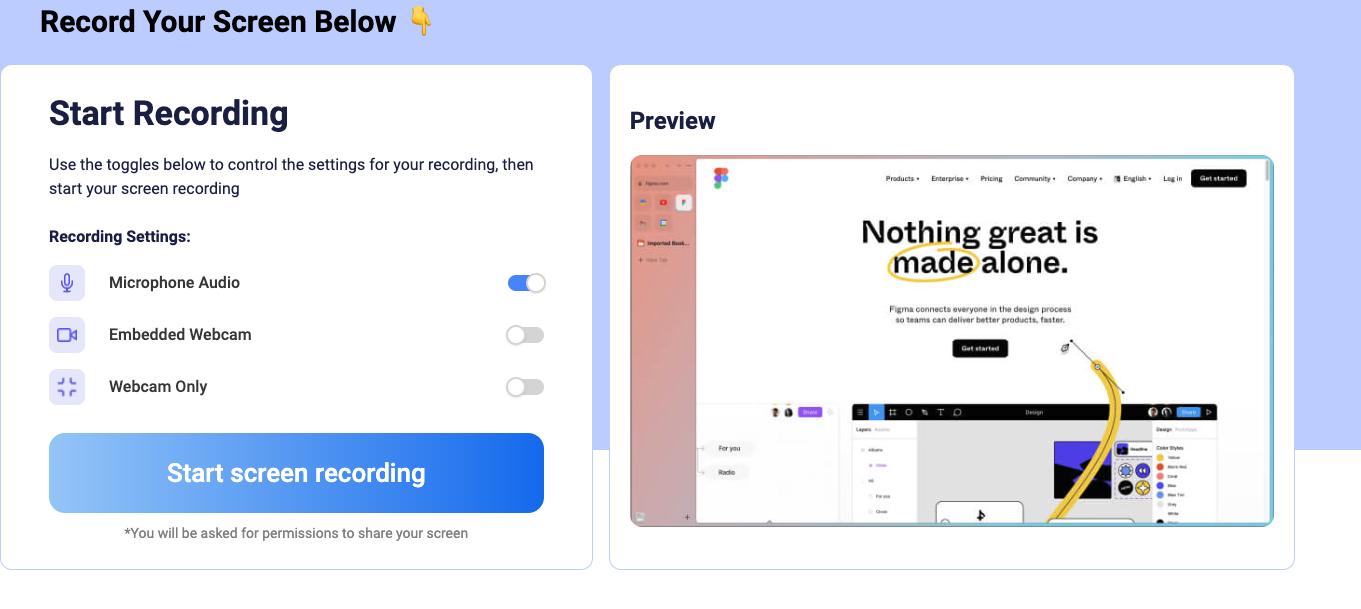
When starting your screen recording session, your browser will prompt you to allow access to your camera and microphone.
After allowing permissions, an overlay window will open up where users can select either browser tab or full-screen mode according to their needs before hitting the record button one last time!
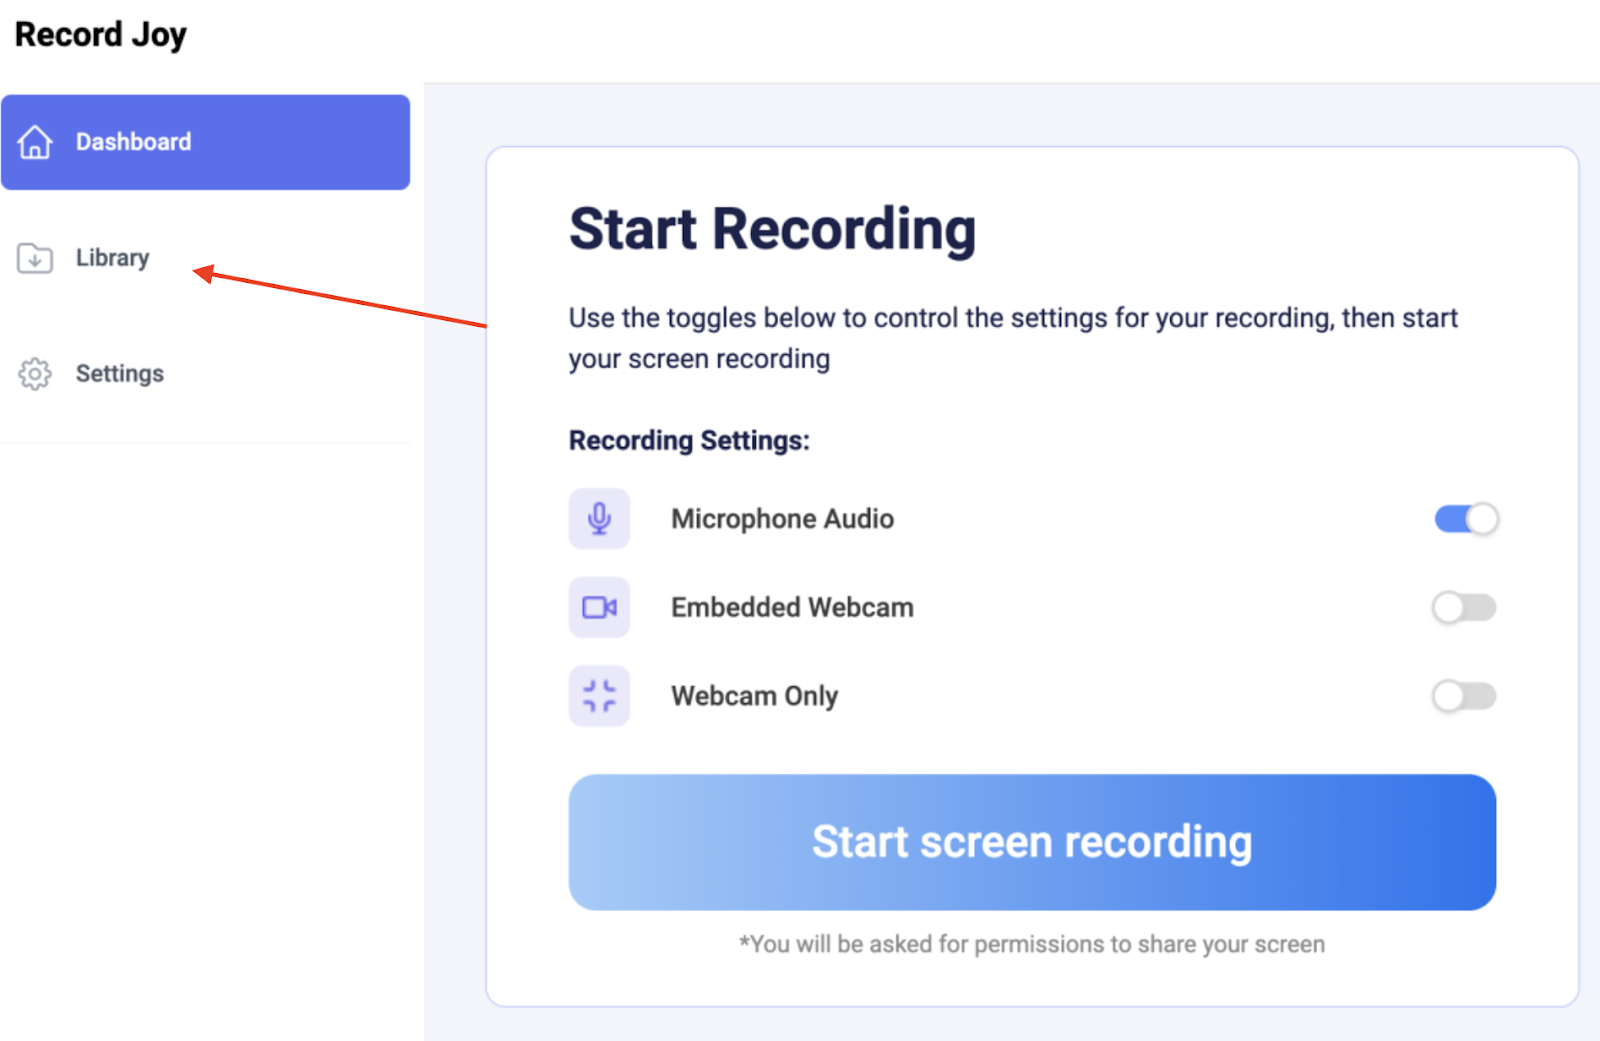
How Do I Access My Recorded Videos Through RecordJoy’s Online Recorder Interface?
Locating your recorded videos in the RecordJoy dashboard is fairly simple. After your are finished recording a video your videos will automatically be saved in RecordJoy’s servers at the “Library” tab under “Dashboard”.
If RecordJoy is all you really need to get started screen recording videos, then give it a try and sign up for a free RecordJoy account, and get recording in a few minutes.